Honeycomb pull apart challah
A beautiful and delicious challah for the upcoming holidays
")
As we approach a new year, with many upcoming holiday meals to prepare, it seems like the perfect moment to share my challah recipe. I’ve had many recent requests for a challah dough that is easy to work with; I think many people want to bake challah but can get overwhelmed easily. This is a foolproof recipe that any beginner baker can manage.
My family custom is to eat water challah, which is a dough made without eggs. Water challah is fluffy yet substantial, so it holds up well for dips and sauces.
There is honey in this recipe, but the dough doesn’t taste sweet, so it goes well with both sweet and savory meals. If you are vegan you can use sugar in place of honey. You can also brush the challah with a thinned-out apricot jam to get a nice shine without using an egg wash.
There are four main areas of difficulty when baking bread that can cause frustration. The first concern is proofing the yeast. I recommend proofing the yeast in a glass bowl or measuring cup.
The second issue arises when the dough is sticky and difficult to work with. My recipe has a decent amount of oil, which makes it a breeze to shape. It’s not sticky and you won’t have a mess on the countertop or on your hands. The oil is what creates a fluffy but rich challah.
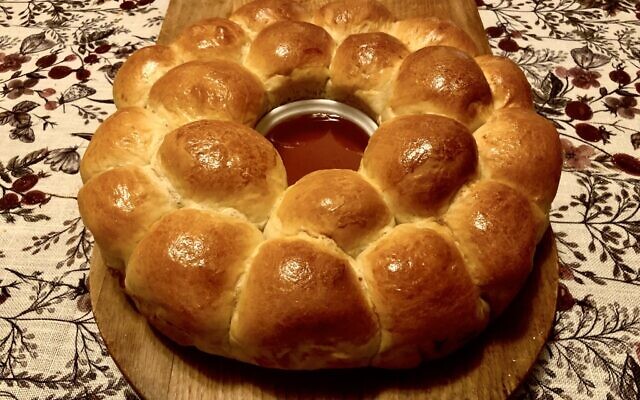
The third area of difficulty is shaping/braiding the loaves. Enter the pull apart challah. You don’t need to roll out strands and learn special braiding techniques — you simply form small balls of dough and place them in concentric circles before baking. The placement is what creates the honeycomb pattern. Making dough balls is as easy as it gets. Sometimes I even put dough balls into bread loaf pans; it can look like a braided challah but without the extra work.
The fourth and last issue that people run into is kneading full batch recipes, especially by hand. When you make a full batch of challah, which has about 5 pounds of flour, there is a mitzvah to take challah and make a bracha. My recipe is for a half batch, so you don’t need to take challah and it’s easier to handle. Hand kneading is a lot of work and 5 pounds of flour may not fit into your mixing bowl — it doesn’t fit into mine.
For Rosh Hashanah through Sukkot, I bake a small ramekin into the center of the pull apart to act as a honey dish. This is not my original idea; I saw it many years ago and enjoy doing it during the holiday season.
My goal is to get you comfortable baking bread. Once it’s part of your life you can work on improving your braiding techniques. This is a good dough if you make fancy braids and designs because it doesn’t dry out or crust over while you’re working with it.
I’m not an expert bread baker and my bread does not look like it belongs in a magazine, but it tastes fantastic and my family appreciates it.
I have one last tip: Bake when you’re calm. Bake when you’re not in a rush. And never bake when you’re in a bad mood. My dearest friend taught me that many years ago. It sounds a little strange, but when I am peaceful in the kitchen you can taste the difference.
Pour your heart out into your challah dough and I promise, even if it doesn’t look perfect, it will taste like pure love.
Ingredients
To proof the yeast:
¾ cup warm water
2 tablespoons honey or sugar
6 teaspoons active dry yeast
For the challah dough:
7 ½ to 8 cups all-purpose flour
½ cup oil (I use avocado oil)
½ cup honey or sugar
1 ½ cups warm water
2 rounded teaspoons coarse sea salt or kosher salt
Egg wash:
1 egg beaten with 2 teaspoons of oil, or apricot jam thinned with water or a bit of oil
Boil a few cups of water in a kettle. Pour ¾ cup of hot water into a glass measuring cup and allow it to cool. When you can comfortably touch the water (think slightly warmer than what you’d bathe a child in) stir in 2 tablespoons of honey. Once dissolved, add the yeast and give it a good stir with a fork. It usually takes 4-5 minutes to proof and rise. There should be about two inches of blooming yeast frothing up toward the top of the measuring cup. The trick is to get it into your mixer before it rises over the edge of the cup.
While the yeast is blooming measure out 1½ cups of the hot water into another measuring cup and set aside to cool. You want to add warm water to the mixer. If it’s hot to the touch, wait for it to cool down or it will kill the yeast.
Add 4 cups of flour, the honey and oil to the mixing bowl. Use your dough hook attachment and set the speed to low. Pour the yeast mixture into the bowl, using a silicone spatula to scrape the remaining yeast from the measuring cup. Mix on low for a few minutes until a thick paste starts to form. The paste does not need to be perfectly smooth.
Add in 3 more cups of flour. Mix until the flour looks combined, then add 1 ½ cups of the remaining warm water that you measured out (don’t add it if it’s too hot to touch). Mix until the water dissipates into the dough.
Add the salt and an additional half-cup of flour and raise the mixer speed to medium. Mix for 2-3 minutes or until the dough is well combined. This is when I decide if the dough needs more flour. Too much flour can give you dry bread, and not enough flour can make the dough sticky. Sometimes you need a little extra flour. I typically use 7 ½ cups, plus an extra tablespoon or two, but this recipe will never need more than 8 cups total. If you’re unsure, just knead it on low for a couple minutes before deciding to add more flour. Sometimes it seems on the wet side but it firms up once kneaded. Also, if the dough seems too dry, you can add an extra tablespoon of water. Once you feel it’s right, knead for 5-7 minutes on low.
Remove the bowl from the mixer. The dough should feel heavy and dense. Use your hands to form the dough into a nice ball. Add a teaspoon of oil to the top of the dough and spread it over the surface before setting the dough ball back into the bowl. Cover the bowl with plastic wrap and a clean towel and allow the dough to rise in a warm place for 45 minutes or until it doubles in size. I often put my oven on a low temperature, like 175 F, and allow the dough to rise on top of my stove. Uncover the risen dough and gently punch it down; the dough will be much lighter and you’ll see immediately that it doesn’t stick to your hands.
Preheat your oven to 350 F, with the wire rack placed one notch above the center.
With pull apart challah, the dough balls should be the same size, just a little larger than a golf ball, or up to the size of a clementine; with multiple rows, though, it’s best to keep them on the smaller side.
Tear off a piece of dough and form it into a ball. The pieces can be slightly smaller or larger so don’t worry about perfection. If making these with the honey dish, line a baking pan or cake pan with parchment paper. Place any ovenproof ramekin in the center of the pan and set the balls around it. Leave a little space between the pieces of dough to allow room for it to rise.
Offset the second row of dough balls so they nest into the first row, leaving a little space again. If you have a room in your pan for a third row you can tuck them in as they fit around the second row. I have a 16-inch-wide pastry pan that fits this recipe. I make it round because it’s traditional to serve a round challah for the holiday, but you can use a rectangular sheet pan with an edge as well. If you don’t have a pan that large, you can use two smaller ones.
Brush lightly with the egg and oil mixture, being careful not to let too much egg wash pool in the cracks.
Cover with plastic wrap and allow the dough to rise again for another 45 minutes.
Uncover the dough and get ready to bake. If the plastic wrap stuck to the challah, add a little extra egg wash right before baking to even out the finish.
I make these plain when I’m serving challah with honey, but during the rest of the year I use toppings so everyone gets what they’re craving. You can add sesame seeds, coarse salt, poppy seeds, everything but the bagel spice, and leave a few plain. I’ve also used dry oats as a topping, which looks natural and pretty.
Bake for 35-45 minutes depending on the size of your pan. Your nose can tell you when challah is done, and it should be a golden honey color. If you want to be sure, you can use a digital thermometer to probe the center; 190-195 F is what it should be.
Remove from the oven and allow to cool for a half-hour. Use the parchment paper to lift the challah out of the pan and let it cool completely on a wire rack. Fill the ramekin with honey or silan (date honey) before serving.
I hope that my recipe brings your family joy. Wishing all of you a happy and sweet new year! We should all be at peace and in good health in the coming year. Enjoy and bless your hands! PJC
Jessica Grann is a home chef living in Pittsburgh. She can be reached at rubia711@gmail.com.
comments